Achieve can be such a scary word. It signifies something done, something reached for and achieved. It's the end of the 'do' process.
The hubster and I were talking the other night and I was wondering out loud why it seemed I had such a hard time finishing projects...getting that letter into the mail...uploading those photos I promised someone...baking the recipe I'd been dying to try. This isn't just being too busy, or forgetting something once in a while, but constant negligence. And he said it was because I wasn't a do-er.
I heartily concurred..I'm a dreamer. If I can imagine it, I feel just as accomplished as though I had done it in real life.
Are you a dreamer? Or a doer? On a Saturday morning, are you the type to finish 5-6 things before lunch? Or read a book and curl up in bed all morning?
I told him a few of my dreams for the future, things I hope to accomplish. I asked him, "Do you think I can do it?"
He said, "Yes."
I said, "But do you think I WILL do it?"
The answer was debatable. So for a few weeks I've been pondering that idea..how much can people change? If you want something badly, can you change enough of your fundamental character to be that kind of person? Can a dreamer become a do-er? Or could a do-er ever slow down to the pace of a dreamer?
The dreams and goals I have for the future require a lot of do-er persona so for the month of October, my focus is DO. It's not achieve (yet!) but the steps up to it.
What's your focus for October?
Thursday, September 30, 2010
Wednesday, September 29, 2010

This week I've been working on this scarf. Nevada weather is still too hot for a traditional thick scarf but this is just right for that end of summer-into fall weather. The tutorial utilizes a lot of different stitches so this is a great starter project for beginner sewers or a refresher for those more advanced.
It took the most time cutting out the pieces because I don't have a large cutting mat but you could get it done in an afternoon.
Here's a link for the full tutorial!
Monday, September 27, 2010


Flower Tutorial

Flower Tutorial
This is an easy tutorial that doesn't require a sewing machine or much experience with sewing.
Materials:
Fabric-I buy a variety of fabric quarters
Matching thread and needle
Glue gun with glue sticks
Iron
Coordinating buttons or appliques
Step 1: Trace out 5 circles for one flower. Depending on the size, if I want a large (app 3 1/4 inches from tip to tip) I trace around my 1 cup measuring cup. If I want a small flower (2 1/2 inches for children's hair or a cluster) I trace around a 1/3 cup measuring cup. You can also use a drinking cup and trace the circumference of the wider top and the smaller bottom for different size flowers.

Can you see those circles? They are at the bottom of the fabric.
Step 2: Iron each circle in half and then half again


Step 3: Line up your circles, this is the way you'll string them onto the thread. This helps esp when I'm doing different colors so I don't loose track of my pattern. If you're doing alternate colors you'll cut and iron 3 of one color and 2 of another and alternate them. Or you could do each circle a different color etc..that's why I love this project, there are so many possibilities!

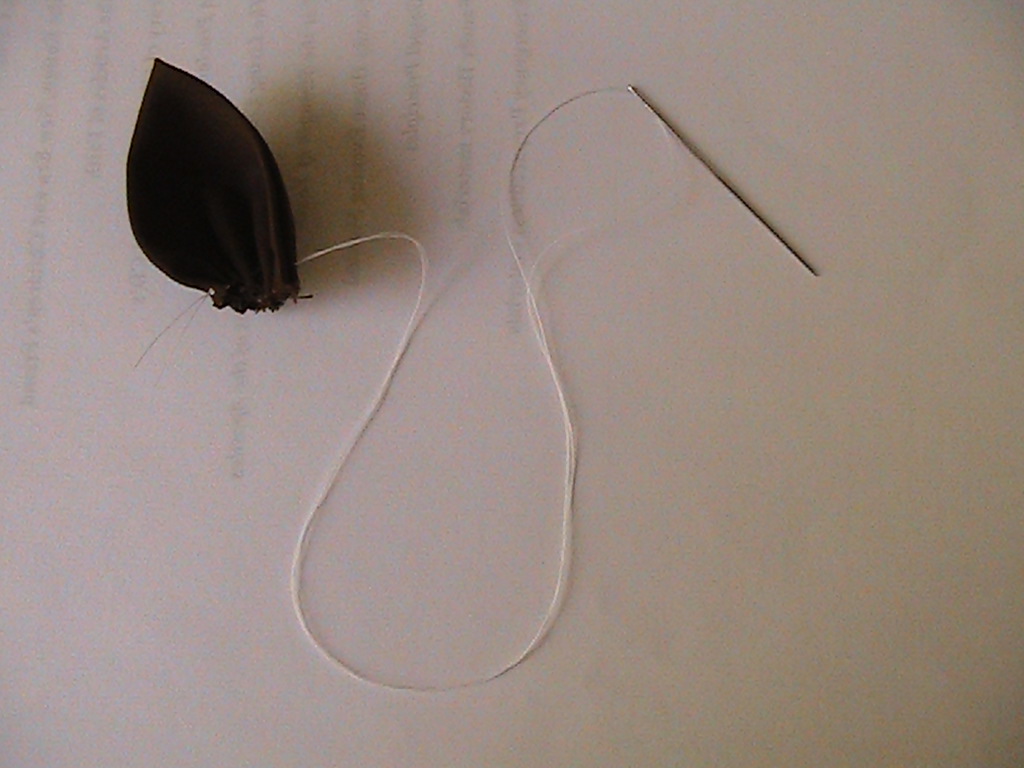
Step 4: Start sewing. Thread your needle, pull the thread through until the ends match up, tie them together with a double knot. I usually give myself 10-12 inches of thread from the needle to my knot but you'll see that it's plenty.
Start sewing by poking your needle through the "backside" towards you at one end of your quarter circle like so:

Go in and out all the way around the rounded edge.

Be careful because the thread might get caught or loop on it's own:

(Ignore the fact that there are 2 petals on this string) But make sure your last stitch starts on the side towards you and goes through to the backside.

Hmmm looks like there is some dough still on my thumb..
Ta da! One of your petals is done. Wasn't that easy? Push it down to the end of your thread
Continue with each circle until you get all 5 onto the string pushing them towards each other and gathering as you go.

Step 5: Now sew the 1st petal and 5th petal together. It's best to use matching thread (I should have used brown) but white was best for the tutorial so you could see it.

Ta da!

Don't worry about a little thread poking out into the center, it will be completely covered up. Now you can leave it as one flower, or make one big one and one small one and stack it on top of each other:
 Step 6: Finishing touches. Glue gun a button, an applique, etc.. you can find these in the scrap booking aisles. Michael's and Hobby Lobby are great sources for this stuff. I used a few different things for the centers..
 I hold my button to the center, flip my flower over and glue gun some glue on one side of the back of the button then press the petals to it and rotate around gluing and pressing until the button is secure all around. Then glue the back of the flower onto a pin or clip or sew onto a headband ... you really can do anything.


Flower Giveaway Winner!
Thanks to everyone who entered our drawing. We're pleased to announce the winner of our first giveaway! Drum roll please.....
Shelby Sorensen! You're awesome!
If you could email us your address I'll send you your flowers asap!
Now, I'm working on the tutorial, Toothless willing, I'll get it posted shortly!
Now, I'm working on the tutorial, Toothless willing, I'll get it posted shortly!
Wednesday, September 22, 2010
Giveaway!
As we've hit and passed our 100th post, we've decided it was high time for our FIRST GIVEAWAY!! (closed, needless to say)

The lucky winner will receive 2 flowers in their choice of coloring. I clip these in my hair with a messy bun, sew them to headbands, to bags, attach them to beaded bracelets around my wrist, pin them onto my shirt or scarf ..the uses are endless!
Here are the colors:

Golden brown, rust print, brown

Red, white with polka dots, red flower print

Black, black zebra, white with white polka dots

Light blue and green paisley print (would go pretty with a blue bracelet!)

Any colors, any mix n' match!
(I apologize if any pictures are blurry..I spilled a bottle in my purse and it got all over the camera!)
You can choose up to 5 fabric colors but I usually stick with 2-3/flower. You have the option of choosing 2 flower pins, or 2 flower headbands (sewed to a small black head band, like a giant hair tie type hair band). Or one of each!
To Enter do the following:
-leave a comment with what color fabrics you'd like your flower to be made of
- become a follower OR if you already are one, tell us!
So that enters your name twice and doubles your chances! We'll draw a random winner Monday morning along with the tutorial of how to make the flowers yourselves!
We're so excited to be giving something back to you,and thanks for reading our blog and for your wonderful comments :)
Love,
Sydney and Jenna
Hello Autumn! And, a Little Fall Craft!
This is a great project that can easily be adapted to having your little one's help, too, or even to do their very own. Start with a vase or container that you like. This is one of my favorites. It is nice and tall.

Pick out fall-like paper or one of my favorites, felt. I do love felt. Get your scissors and tape, too. Double sided tape would make this project a little easier for little hands. Begin cutting out leaves of all sizes and shapes.
 I came across a packet of "maple leaves" at Jo Anne's and opted to use them for this craft...instead of cutting out leaves from felt and/or paper. They were just so pretty and really...they just jumped out at me! Buy me! Buy me! Buy me now! So, I did...for a dollar.
 Begin to attach your leaves to your vase by using your tape on the back of your leaves. Make sure to press your adhesive against the glass with a little oomph! Otherwise, your fall leaves will begin to fall.
Keep on going! Round and round.
 Before you know it, you will have covered your vase. Add lots of leaves or I chose to leave a little spacing between leaves because of what I was doing next......
 I filled my vase with "apple orchard" potpourri...and scattered a few leaves and such. Smells so good! Wouldn't this be pretty with some acorns scattered around, too?
 Simple, easy, and a perfect little splash of fall color as we begin a new season. Good-bye summer. Hello Autumn!
Tuesday, September 21, 2010
Fair Weather...Part 2
Back to the Fair.....checking out the livestock!
 Calves
 All kinds of sheep and goats!
 PIGS!
PIGS! Have you ever had an Elephant Ear?
 This is the Elephant Ear Wagon. Many, many, many years ago, our church had to raise a certain amount of money each year to help pay for building costs. Our church gutted out a trailer and transformed it into what it is today....The Elephant Ear Wagon. As time went on, and our church did not have to raise funds anymore, different groups worked the Elephant Ear Wagon and earned money for their group...for example, Boy Scouts, Marching Bands, Girls camp money, etc. Then, it came time, to move on. A few years ago, the Elephant Ear Wagon was sold to Amie Jo. We felt sad, but, really like Amie Jo and her mother.
 This, is an Elephant Ear. It is just the BEST! Hubby and I look forward to getting and Elephant Ear each year at the Fair. Delicious.
And, on Friday night of the Fair, before the truck/tractor pull, we eat this.....a bucket of fresh cut fries and a corn dog. Why does the Fair make these food items taste so good? Really....such a divine, once a year splurge!
 Have you ever been to a tractor or truck pull? It is fun , exciting and take your ear plugs. It gets really, really, really...I mean, really loud. It all starts out with Farm tractors, doing their best to pull the sled of weight. We see how far each can pull the weight until they just cannot go any further. Additional weight is added for the beefier, more high powered tractor's. Otherwise, they would just rip right through the arena and out the other side.
 Some BIG-BAD, super-duper, tractors give us quite a show.
 This powerful tractor is doing what's called, "Building the Boost".
 Hard to see...but, helmets and full body attire is worn. The competitors look like race car drivers, all decked out. And, this competitor is getting ready to "Build the Boost". Once the exhaust turns black, like in the picture above, you take off. And wow! When they take off, it is massive.
Then, we get down to some fun trucks. They can really haul!

Nice!
 Powerful stuff.
 So fast, and so loud! Was super cool!
 Well, until next year. Ya' all should really come to the Fair.

Nice!
 Powerful stuff.
 So fast, and so loud! Was super cool!
 Well, until next year. Ya' all should really come to the Fair.
Subscribe to:
Posts (Atom)