
Flower Tutorial
This is an easy tutorial that doesn't require a sewing machine or much experience with sewing.
Materials:
Fabric-I buy a variety of fabric quarters
Matching thread and needle
Glue gun with glue sticks
Iron
Coordinating buttons or appliques
Step 1: Trace out 5 circles for one flower. Depending on the size, if I want a large (app 3 1/4 inches from tip to tip) I trace around my 1 cup measuring cup. If I want a small flower (2 1/2 inches for children's hair or a cluster) I trace around a 1/3 cup measuring cup. You can also use a drinking cup and trace the circumference of the wider top and the smaller bottom for different size flowers.

Can you see those circles? They are at the bottom of the fabric.
Step 2: Iron each circle in half and then half again


Step 3: Line up your circles, this is the way you'll string them onto the thread. This helps esp when I'm doing different colors so I don't loose track of my pattern. If you're doing alternate colors you'll cut and iron 3 of one color and 2 of another and alternate them. Or you could do each circle a different color etc..that's why I love this project, there are so many possibilities!

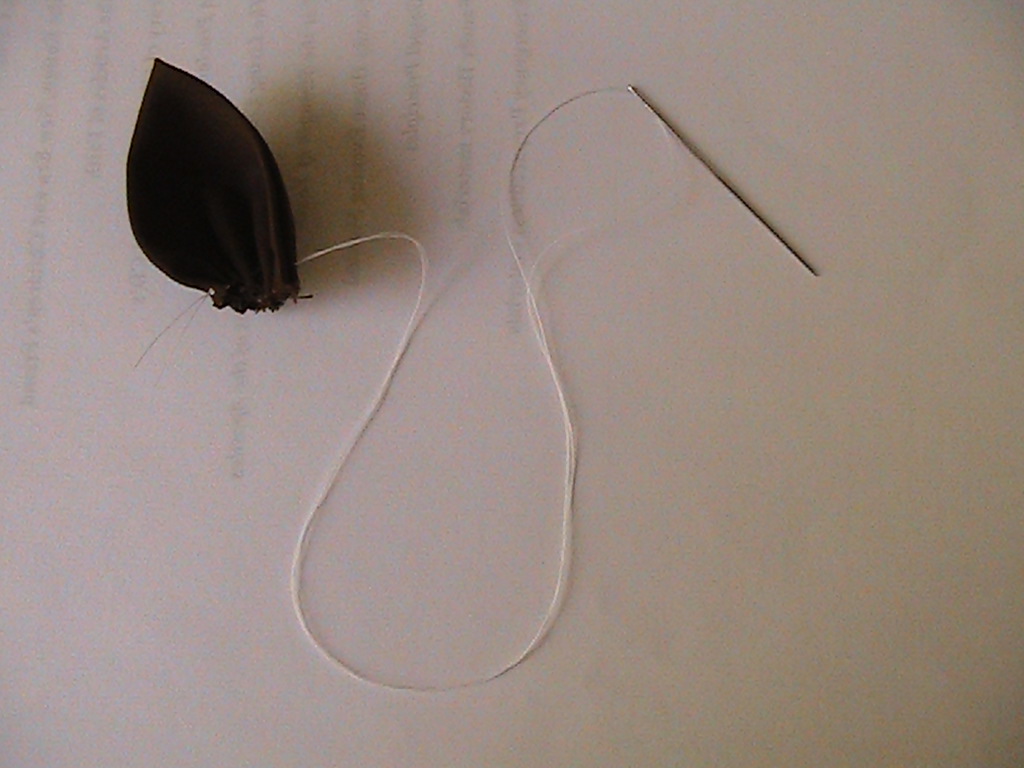
Step 4: Start sewing. Thread your needle, pull the thread through until the ends match up, tie them together with a double knot. I usually give myself 10-12 inches of thread from the needle to my knot but you'll see that it's plenty.
Start sewing by poking your needle through the "backside" towards you at one end of your quarter circle like so:

Go in and out all the way around the rounded edge.

Be careful because the thread might get caught or loop on it's own:

(Ignore the fact that there are 2 petals on this string) But make sure your last stitch starts on the side towards you and goes through to the backside.

Hmmm looks like there is some dough still on my thumb..
Ta da! One of your petals is done. Wasn't that easy? Push it down to the end of your thread
Continue with each circle until you get all 5 onto the string pushing them towards each other and gathering as you go.

Step 5: Now sew the 1st petal and 5th petal together. It's best to use matching thread (I should have used brown) but white was best for the tutorial so you could see it.

Ta da!

Don't worry about a little thread poking out into the center, it will be completely covered up. Now you can leave it as one flower, or make one big one and one small one and stack it on top of each other:
 Step 6: Finishing touches. Glue gun a button, an applique, etc.. you can find these in the scrap booking aisles. Michael's and Hobby Lobby are great sources for this stuff. I used a few different things for the centers..
 I hold my button to the center, flip my flower over and glue gun some glue on one side of the back of the button then press the petals to it and rotate around gluing and pressing until the button is secure all around. Then glue the back of the flower onto a pin or clip or sew onto a headband ... you really can do anything.


I love these flowers. I am going to try and make some today. They really do brighten and accent quite a few ticket items we all have and wear. Thanks for sharing this with all of us. xoxoxo
ReplyDeletejenna! all these photos and directions look so professional, i love it. and the flowers can go with anything, too. i think my favorite would have to be the headband though, so cute!
ReplyDeletethis is lovely! thanks for the tutorial
ReplyDelete